ICE PREP AND CLEAN UP DUTIES
Ice prep starts with hauling out the rocks. Wine Country Curling Club has 80 rocks total which is 16 stones per sheet. When we aren’t curling, we store the rocks on refrigerated mats on the shelves in the WCCC corner of Rink #2.
Turning on the Rocks
On Friday afternoons, a member of the WCCC Ice Crew turns on the refrigerated mats by coming into the rink and pressing a series of buttons on the chiller. The chiller’s temperature is set for at 45 degrees, but starting on Fri evening and all the way until Tues night, the mat drops to (and stays at) 25 degrees. The rocks sit on the mats and throughout the duration of the weekend, they drop in temperature (ideally 23-26 degrees). Too cold = frost and won’t curl. Too warm = melts into the ice and leaves rings.
If you’d like to join the text message group for “turning on the rocks”, contact Katie at 916-849-9731. We’ll usually start a thread around 12:00pm on Fridays to see who can turn them on.
Moving Rocks
Please be careful taking the rocks off the mats. Try not to slide them as that would pick up unnecessary debris and carpet fibers. When carrying the rocks, don’t bump them into the walls or benches. Carefully place them on the ice and then push them to the right sheet. (The far sheet from the entry point is Sheet A.) Note: if you pop a hack (described below) while pushing out rocks, you have to buy a pitcher of beer after the game. Ideally a crew of 8+ is there to help haul out rocks. If we had 8 people helping, then each person would only need to carry 10 stones each. Sadly, we usually only get 4 people helping, so that is 20 stones per person. A person moving 20 stones is handling 850 pounds. The adage “many hands make light work” fits perfectly here!
Organizing Rocks
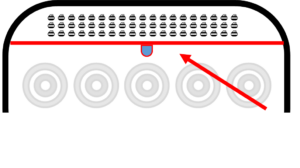
If you aren’t physically able to haul out rocks, then we highly encourage you to help get them organized! The rocks are already on the ice at this point and all that’s needed is that the rocks get to the correct sheet. Because pebbling is coming soon, please organize the rocks behind the red hockey line.
Our current setup = Set #3 goes to Sheet 1, Set #4 goes to Sheet 2, Set #5 goes to Sheet 3, Set #15 goes to Sheet 4, and Set #16 goes to Sheet 5. In 2025, we’ll have a new set of 80 rocks and they will be labeled A, B, C, D, E and our sheets will also change to A, B, C, D, E.
Scoreboards
Putting out scoreboards comes next! These also go behind the red hockey line so that the pebbler won’t run into them. This is also a perfect job for someone who hasn’t hauled rocks!
We have 5 sheets and 5 scoreboards. The nametags for each game are in the clear box. Use the schedule on our website to put the nametags in the right order and then place them on the scoreboards so that both names are visible. This helps teams figure out which sheet they are playing on. Once teams have flipped a coin, they will put their nametag on the right color.
Setting Hacks
Setting hacks is very easy to do but it’s incredibly important to make sure you are setting them correctly.
During the months of March to October, your body heat (#hugahack) gives off enough heat to properly bring the hacks down to the right temperature so that they can melt into the ice.
In November to February, the hacks need to be dipped in warm water … and the dip should be no longer than 4 seconds.
Locate the right spot on the ice, place the hack down and then step in the middle of the two footholds. This initial press will force the hack into the ice. After about a minute, move your feet to the inside of each of the footholds. This next press forces the hack down and out which ensures proper installation.
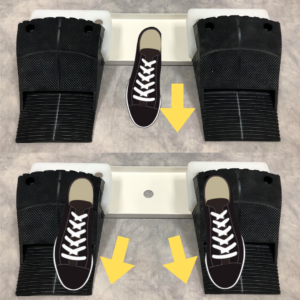
Installation of a hack should be approximately 4 minutes. You can check your work by running a finger along the flat metal area between the footholds. If there is no space and a little bit of melt has occurred, then you have successfully installed the hack. In the summer months, we also add some water to the back of the hacks to really make sure they stick.
Sometimes setting of the hacks occurs when rocks are still being brought out on the ice. Reminder, if someone pops a hack while pushing out rocks, that person has to buy a pitcher of beer after the game.
Equipment
The rest of the equipment is brought out from the WCCC corner as follows:
- Stabilizers go on the hockey bench.
- Sliders go on the hockey bench.
- The bell goes on the edge of the rink by the hockey bench. (It’s usually stored in the same box as the sliders.)
- A box of tissues goes on the edge of the rink by the hockey bench.
- The grippers go by the main entrance onto the rink.
- The brooms are stored under the stairs in rink #2 and are brought out to the door by the cafe. Ask anyone for the code for the broom closet. It's widely known.
Nipping and Mopping
Once the rocks are out and the Zamboni is parked, we then have full access to the rink and can begin the ice prep process. While Skatetown Ice and the Zamboni do a relatively good job of giving us a blank slate (trust us, we’ve seen worse), we have a few extra steps before we start pebbling. The order of events is:
Nipping > Mopping > Pebbling > Nipping
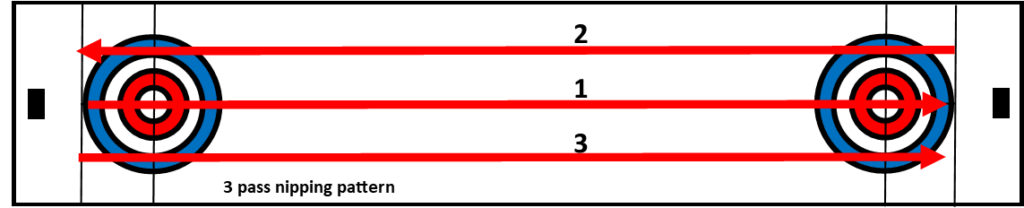
The nipper is used first to break up any frozen ice pellets that the Zamboni may have left. This can sometimes happen if the driver is driving too fast or not emptying the load at the right time. The nipper is a series of 3 VERY SHARP blades that run along the ice. A lambskin mop attachment is attached to the back of the nipper to help pick up what the nipper breaks up.
The nipper travels each sheet 3 times: (1) up the center, (2) down the side, (3) up the other side:
If you *have* to do just 2 paths (sometimes on Tuesday nights because our ice prep time is short), then the path looks like an hourglass:

Next up: mopping! Mopping after the first nipping also picks up debris from both the Zamboni and the previously used nipper.

Pebbling
Pebbling is advanced level ice prep and training is required.
We typically have 2 people doing the pebbling: one to do the edges and tops of the rink and one who does all 5 sheets using one can. This for consistency. One person doing the main pebbling will be more consistent than two people trying to match each other’s tempo.
It should take 40 seconds of walking backwards on each sheet. We use hot water for pebbling.
As the water hits the ice, it takes a few seconds to fully freeze, so be careful walking on freshly pebbled ice.
After pebbling, we do one more pass of the nipper following the same 3-path process from earlier:
Cleaning Up
- Rocks get put back on the shelves. We have each shelf designated for each set - check the map that shows what goes where. Putting them back organized by sheet is helpful when we show up to the next league which might not be as full or might not need to use all 8 stones (like doubles). Be careful … try not to slide them on; instead place them centered onto the white strips because that’s where the cold is. If they hang off the edge of the white mat, then they won’t get as cold as the other stones and you’ll get an inconsistent rock next time you curl!
- Pop the hacks using the Hack Remover 5000 (a leftover broom from so long ago). Don’t use your own broom.
- Fill the hack holes with snow from the Zamboni. The bucket and shovel is hanging on the wall by the Zamboni door. Take a little bit of the snow and pack it into the holes that the hack left. This helps return to the ice to the condition that we received it in. The hockey players also appreciate it.
- Cover the rocks with the plastic sheeting or the purple box to insulate them in the cold.
- Put the grippers away on the top shelf. Make sure all the LTCers have taken them off and aren’t taking them home.
- Store the stabilizers and sliders back onto the shelves.
- Organize the nametags into the correct binder clip so the person doing the task the next week doesn’t have to go through all of them to find the right batch.
- Wheel the brooms back into the closet. Make sure to lock it back up.
- A member of the ice crew will return the nipper to its stored location … that member will also wipe down the blades and spray some WD-40 onto them.